bluename
 How to Fix Large Water-Soaked Necrotic Spots on Alocasia Amazonica Leaves
Those big, dark, soggy-looking spots on your Alocasia amazonica leaves are almost always a sign of root rot caused by overwatering, and the fix starts with pulling back on water immediately, repotting into a fast-draining mix, and trimming away the damaged tissue before it spreads. I know that sounds like a lot, but trust me — I've killed more than one of these dramatic plants learning this lesson. The good news is that Alocasia amazonica (often sold as Alocasia Polly) can bounce back fast if you catch the problem early. In this guide, I'll walk you through exactly what I did over a two-week stretch to save my own plant, the mistakes I made along the way, and the three big errors that trip up almost every new grower.
What Those Water-Soaked Spots Actually Mean
Let's be clear from the start: those large, mushy, dark brown or black patches aren't a cosmetic issue. They're a distress signal.
The technical term is "necrosis," which just means tissue death. When it happens on Alocasia leaves and the spots feel wet or soft to the touch, you're almost certainly dealing with a root problem that's traveled up the plant.
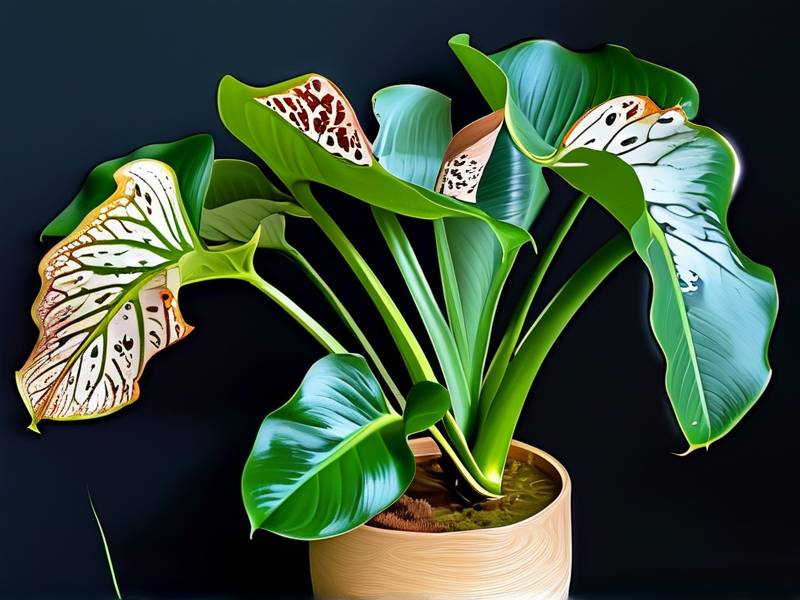
Here's the chain of events. Water sits in the soil too long. The roots suffocate and start to rot. Rotting roots can't take up nutrients or fight off bacteria. The bacteria spread upward through the plant's vascular system, and the first visible sign is usually those ugly wet spots on the leaves.
I've seen this happen within four days of a single overwatering. Just four days. These plants don't mess around.
90% of indoor plants die from overwatering — that's a stat I've heard repeated by horticulturists for years, and my own experience backs it up. The Royal Horticultural Society (RHS) has long warned that poor drainage and excessive watering are among the top killers of houseplants. The American Horticultural Society (AHS) makes similar points about container plants needing oxygen at the root zone.
So no — you're not dealing with a mysterious disease. You're dealing with a watering problem that's turned into a bacterial or fungal issue.
The Three Biggest Mistakes New Growers Make
I've made all three of these. Every single one. Let me save you some heartbreak.
Mistake #1: Overwatering (The Big One)
This is the root cause of about 80% of Alocasia problems I see. People water on a schedule instead of checking the soil. They see a droopy leaf and think "thirsty" when it's actually drowning.
Alocasia amazonica likes consistent moisture, not wet feet. There's a huge difference. Think of a wrung-out sponge, not a swamp.
I used to water mine every Sunday no matter what. That worked for about three weeks. Then the spots showed up.
Mistake #2: Wrong Light Position
Alocasia amazonica needs bright, indirect light. Not low light. Not direct afternoon sun.
If you stick it in a dark corner, the soil stays wet forever because the plant isn't actively growing or using water. If you put it in direct sun, the leaves scorch and you get brown crispy edges — which is a totally different problem from wet necrotic spots.
The trick is finding that sweet spot: a few feet back from a bright window, or near an east-facing window where morning light is gentle.
Mistake #3: Using the Wrong Pot
This one took me way too long to figure out. A decorative pot with no drainage holes is basically a death sentence for Alocasia.
Even if you're careful with watering, there's nowhere for excess to go. It just pools at the bottom and slowly rots the roots from below.
I now use terracotta or unglazed ceramic pots with at least one good drainage hole. Terracotta wicks away moisture, which gives you a bigger margin for error.
Also — don't go too big. A pot that's more than two inches wider than the root ball holds way too much wet soil around the roots for way too long.
My Two-Week Rescue Plan (What I Actually Did)
I want to walk you through this step by step because I remember how overwhelming it felt the first time I dealt with it.
Day 1: Diagnosis and Emergency Repot
The first thing I did was pull the plant out of its pot. I knew something was wrong when the soil smelled sour — that's a dead giveaway for root rot.
I rinsed the roots under room-temperature water to see what I was working with. About half of them were brown and mushy. The healthy ones were firm and white or light tan.
I cut away every rotten root with sterilized scissors. I dipped the remaining roots in a diluted hydrogen peroxide solution (one part 3% peroxide to three parts water) for about five minutes. This helps kill off bacteria without harming healthy tissue.
Then I repotted into a chunky aroid mix: roughly 40% orchid bark, 30% perlite, 20% coco coir, and 10% worm castings. This stuff drains fast.
Day 1 (Continued): Trimming the Leaves
I removed the two worst-affected leaves entirely. They were more than 60% necrotic and there was no saving them. Keeping them would only give bacteria more tissue to feed on.
For leaves with smaller spots, I used clean scissors to cut away just the damaged areas, leaving a small margin of healthy tissue around the cut.
I also wiped down the remaining healthy leaves with a damp cloth to remove any bacterial residue.
Days 2–4: Holding Back on Water
This was the hardest part for me. I did not water the plant at all for the first four days after repotting.
The fresh mix had a little moisture from the coco coir, and the plant needed time to recover from the shock of repotting and root trimming.
I kept it in a spot with bright, indirect light and decent airflow — not near a drafty window, but with a small fan running on low in the room. Air movement helps prevent fungal growth.
Days 5–7: First Light Watering
By day five, the top two inches of soil felt dry. I gave it a light watering — just enough to moisten the mix, not soak it.
I also checked the remaining leaves daily for any new spots. There was one small dark patch that appeared on day six. I cut it out immediately.
Days 8–14: Watching for New Growth
This is the part where you find out if your plant is going to make it.
Around day ten, I noticed a tiny new leaf unfurling from the center. That was my sign that the roots were recovering.
By day fourteen, the new leaf had opened fully and showed no signs of necrosis. The existing leaves stayed stable — no new spots, no spreading.
I watered only when the top inch or two of soil felt dry, which ended up being about every seven to eight days in my conditions (temps around 72°F, moderate humidity).
What I Learned the Hard Way
I've killed three Alocasias before I finally got this right. The first one I drowned. The second one I put in a north-facing window with almost no light. The third one I kept in a glazed pot with no drainage.
The one I have now has been going strong for over a year. It's pushed out six new leaves since the rescue.
Here's what I wish someone had told me earlier:
Watering isn't a schedule — it's a conversation with the soil. Stick your finger in. If it's wet, don't water. Simple as that.
Airflow matters more than you think. A little bit of moving air goes a long way in preventing the bacterial issues that cause those wet spots.
When in doubt, repot. If you see mushy spots and the soil smells off, don't wait. Every day you delay gives the rot more time to spread.
Don't fertilize a sick plant. I made this mistake once. Fertilizer stresses damaged roots and can make things worse. Wait until you see new growth before feeding again.
Long-Term Prevention for Alocasia Amazonica
Once your plant is stable, keeping it that way comes down to a few consistent habits.
Use a well-draining aroid mix. Standard potting soil holds too much water. Amend it with bark and perlite, or buy a pre-mixed aroid blend.
Water only when the top inch of soil is dry. In winter, this might mean every 10–14 days. In summer, maybe every five to seven.
Keep humidity high but not wet. Alocasia loves 60–70% humidity. A pebble tray or humidifier helps. Misting the leaves themselves isn't great — it can encourage bacterial spots.
Avoid overhead watering. Pour water at the soil line, not over the leaves.
Check the pot regularly. Make sure drainage holes aren't clogged and the plant isn't sitting in a puddle in a saucer.
Inspect weekly. Catching a small spot early is way easier than dealing with a full-blown rot situation.
The RHS recommends always using clean pots, fresh compost, and sharp tools when repotting — good advice that I now follow religiously.
FAQs
Can my Alocasia amazonica recover from large water-soaked necrotic spots?
Yes, as long as the roots and crown are still healthy. If the rot has reached the base of the plant and the core is mushy, it's usually too late. But if there's firm tissue left, there's a good chance it'll bounce back. My own plant had about 50% root loss and still recovered within two weeks.
Should I cut off all the affected leaves?
Only remove leaves that are more than 60% damaged. For smaller spots, trim just the necrotic tissue and leave the healthy parts. The plant needs those leaves for photosynthesis, so you don't want to strip it bare unless you have to.
How do I know if I'm overwatering or underwatering?
Overwatering causes soft, dark, wet-looking spots and yellowing lower leaves. Underwatering causes dry, crispy brown edges and drooping. If the spots feel mushy and the soil smells sour, it's overwatering. That's the one you're dealing with here.
Final Thoughts
Those big wet spots on your Alocasia amazonica are scary, but they're fixable. The key is acting fast — repot, trim, hold back on water, and give the plant time to recover. I've been through this rescue more than once, and I can tell you from experience that these plants are tougher than they look once you get the watering right.
Stop watering on a schedule. Start checking the soil. Use a pot that drains. And don't panic — two weeks from now, you might be looking at a brand-new leaf just like I was.