How to Care for Aloe Vera Barbadensis - Offset Transplanting for High Survival Rate
You've nurtured your Aloe Vera Barbadensis, also known as true aloe, into a thriving plant. Now, it's surrounded by a cluster of adorable baby plants, or "pups." While charming, this overcrowding can stunt the growth of both the mother plant and its offsets. The solution? Transplanting. Yet, the process often fills plant owners with dread. A wrong move can lead to rot, shock, or a failed propagation attempt. This guide is designed to transform that anxiety into confidence. We will walk you through a meticulous, step-by-step process for Aloe Vera offset transplanting that prioritizes a high survival rate. By understanding the plant's needs and following proven techniques, you can successfully multiply your aloe collection and ensure every pup thrives.
Understanding Aloe Vera Barbadensis and Its Offsets
Before diving into transplantation, it's crucial to understand your plant. Aloe Vera Barbadensis Miller is the most recognized medicinal species. It stores water in its thick, fleshy leaves, making it highly susceptible to overwatering, especially during the vulnerable transplant phase.
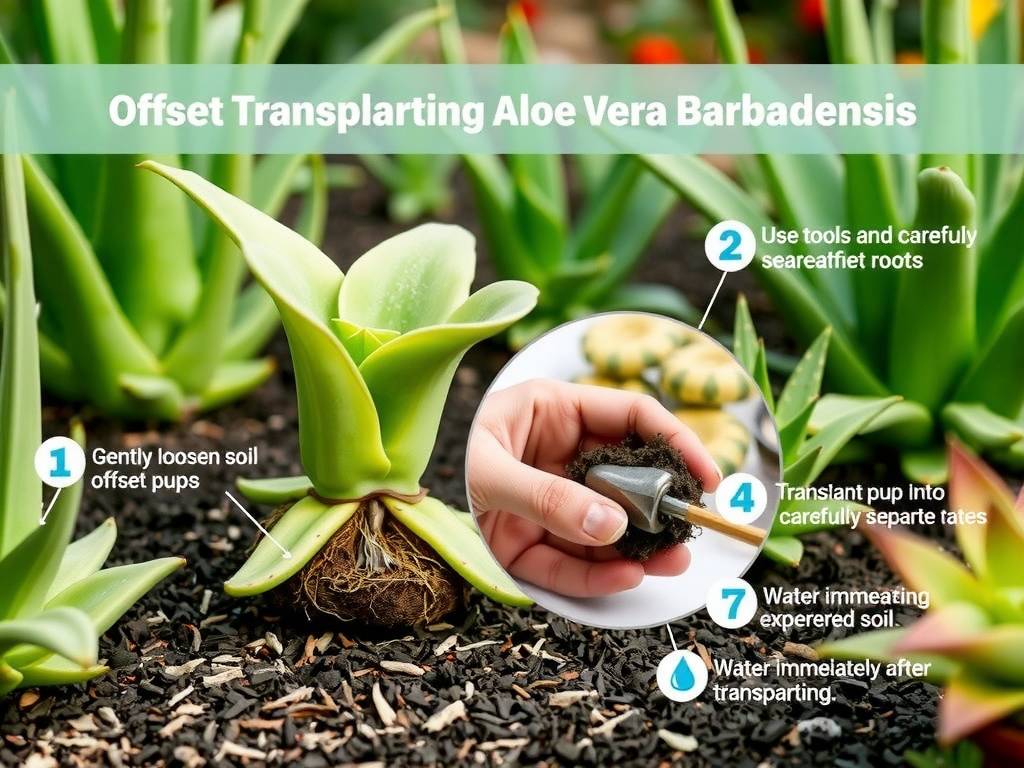
Offsets, commonly called pups, are natural clones that sprout from the base of the mother plant. They share the same root system initially. The goal of transplanting is to gently sever this connection and establish the pup as an independent plant. Successful separation hinges on timing and the pup's maturity. A pup ready for transplant should be roughly one-third the size of the mother plant and have several sets of its own leaves. As noted by the Royal Horticultural Society (RHS), separating offsets that are too small often results in failure because they lack sufficient energy reserves.
Pre-Transplant Preparation: Setting the Stage for Success
Success begins long before you make the first cut. Proper preparation creates an optimal environment for your aloe pup's new beginning.
Gathering Your Tools and Materials You will need:
- A sharp, sterile knife or pruning shears.
- Fresh, well-draining potting mix (a cactus/succulent mix is ideal).
- A new pot with adequate drainage holes.
- A trowel.
- Optional: Rooting hormone powder (can aid root development). Sterilizing your cutting tool with rubbing alcohol is non-negotiable. It prevents the transfer of pathogens to the fresh wound, a critical step for ensuring aloe pup survival.
Selecting the Perfect Potting Mix Aloe roots demand excellent drainage. A standard potting soil retains too much moisture. Opt for a commercial cactus mix or create your own blend. A reputable recipe, often endorsed by succulent experts, involves one part potting soil, one part perlite, and one part coarse sand. This structure mimics the aloe's natural, arid habitat and is fundamental for preventing root rot.
Choosing the Right Container Select a pot that is just 1-2 inches wider in diameter than the pup's base. A pot that is too large holds excess soil that stays wet for too long. Terra cotta pots are excellent for aloe vera as they are porous, allowing soil to dry more evenly than plastic or ceramic pots.
The Step-by-Step Offset Transplanting Process
This is the core of the operation. Move slowly and deliberately for the best outcome.
Step 1: Preparing the Mother Plant Water the mother plant lightly 1-2 days before transplanting. Slightly moist soil makes it easier to remove the entire plant from its pot and reduces root shock. Do not water if the soil is already damp.
Step 2: Removing the Plant and Exposing the Offset Gently tip the pot on its side and carefully ease the entire aloe plant, including the mother and pups, out of its container. Brush away excess soil from the root ball to clearly see where the pup connects to the mother.
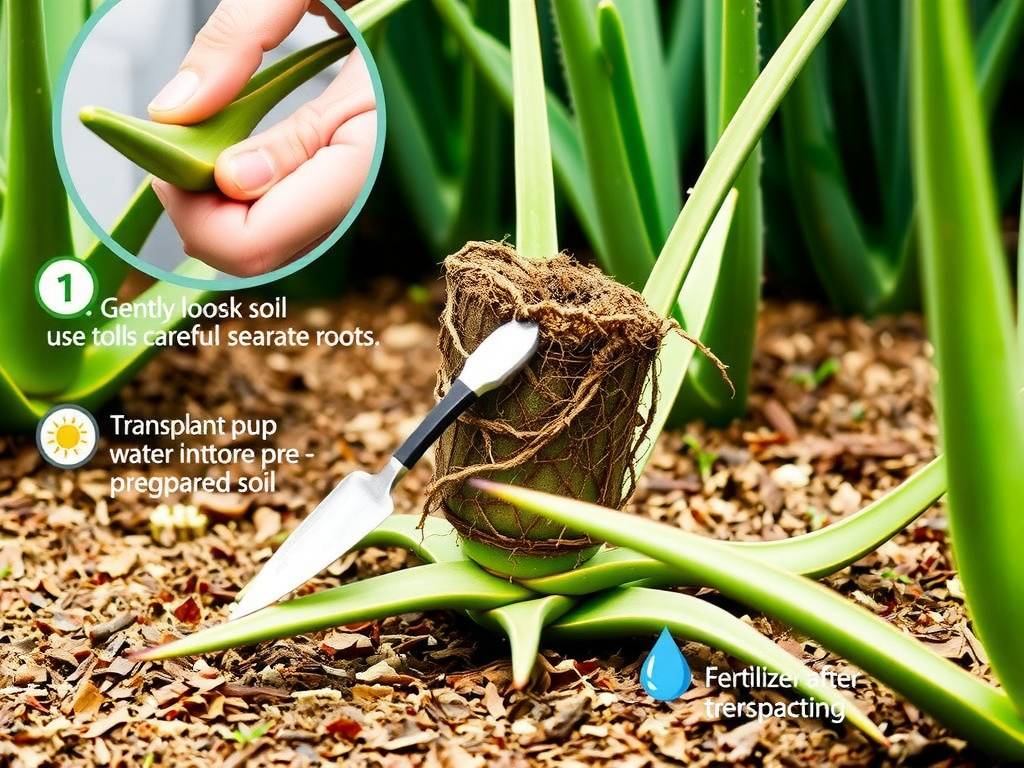
Step 3: Separating the Aloe Vera Pup Locate the point of attachment. If the pup has developed its own root system, you may be able to gently tease it apart with your fingers. More often, it is connected by a stout stem or rhizome. Use your sterilized knife to make a clean, swift cut, ensuring the pup retains as many of its own roots as possible. If no roots are attached, don't panic—the pup can still root from the base.
Step 4: The Critical Callousing Period This is the most overlooked yet vital step for a high survival rate aloe transplant. Do not plant the freshly cut pup immediately. Place it in a warm, dry, shaded spot out of direct sunlight. Allow the cut end to dry and form a callous—a thin, hardened layer over the wound. This process typically takes 2-5 days. Planting before callousing invites soil-borne bacteria to enter, leading to almost certain rot.
Step 5: Potting Your New Aloe Vera Plant Once calloused, plant the pup in its prepared pot. Fill the bottom with your potting mix, place the pup in the center, and gently fill around it. The base of the leaves should sit just above the soil line. Do not bury the fleshy leaves. Press the soil lightly to stabilize the plant.
Post-Transplant Care: The First Crucial Weeks
Your care in the weeks following separation determines the final success of your Aloe Vera offset transplanting.
Initial Watering and Placement Do not water immediately after potting. Wait 5-7 days to allow any minor root disturbances to heal. Then, give it a thorough but gentle watering until water runs from the drainage holes. Place the pot in a location with bright, indirect light. Avoid direct, harsh sunlight for the first 2-3 weeks, as the plant is stressed and more prone to sunburn.
Establishing a Watering Routine The mantra is "soak and dry." Water deeply only when the soil is completely dry several inches down. Overwatering is the fastest way to kill a newly transplanted aloe. In winter, watering may be needed only once a month or less.
Monitoring for Signs of Health or Distress Healthy signs include firm, plump leaves and eventual new growth from the center. Signs of distress include brown, mushy leaves (overwatering/rot) or thin, curled, red-brown leaves (underwatering or sunburn). Adjust care accordingly.
Troubleshooting Common Transplant Problems
Even with perfect care, issues can arise. Here’s how to address them.
Addressing Root Rot If the base becomes soft and discolored, act fast. Remove the plant from its soil, cut away all soft, rotten tissue with a sterile tool, and let it callous again. Replant in fresh, dry mix and withhold water for at least a week.
Dealing with Transplant Shock Some wilting or paling is normal. Ensure it's not in direct sun and that you are not overwatering. The plant should stabilize with consistent, careful care. The American Horticultural Society (AHS) advises that patience is key, as succulents recover from shock on their own timeline.
Encouraging Root Growth in Rootless Pups If your pup had no roots, follow the callousing process and plant it. Watering should be even more minimal—only a light mist around the soil every few weeks—until you feel resistance when giving the plant a gentle tug, indicating root formation.
Why is my transplanted aloe pup turning brown and soft? This is almost always a sign of overwatering or planting before the cut end had time to callous. The tissues are rotting. You must unpot the plant, remove all rotten parts, and start the callousing process over with the remaining healthy tissue.
How long does it take for a transplanted aloe pup to show new growth? Do not expect visible growth immediately. The plant's energy is focused underground on root establishment. You may see new, plump leaves emerging from the center in 4-8 weeks. A lack of top growth is not a sign of failure during this period.
Can I transplant aloe pups directly into the garden? In suitable climates (USDA zones 9-11), you can, but the same rules apply. Ensure the garden soil is exceptionally well-amended for drainage, separate and callous the pup properly, and protect it from intense rain or sun initially. For most, starting in a pot allows for greater environmental control for a high survival rate.
Transplanting Aloe Vera Barbadensis offsets is a rewarding practice that extends the life of your mother plant and grows your collection. The journey from a dependent pup to an independent, thriving plant hinges on a few key principles: selecting a mature offset, using sterile tools, enforcing a mandatory callousing period, and mastering a restrained watering regimen. By respecting the aloe's succulent nature and providing conditions that mimic its arid origins, you significantly tilt the odds in your favor. With this knowledge, you can approach the process not with apprehension, but with the assurance that you are giving your aloe pups the best possible start in their new home.


